SpringBoot多模块中Service模块无法加载Entity模块程序包

Service模块能够正常调用Entity模块方法,但是一到统一打包的时候发现Entity某个程序包不存在

这种原因导致的原因是Entity本身不能通过Maven打包成可执行包。

我们可以把Entity打成可以执行的包就不会出现上述问题了。

<plugins>
	<plugin>
		<groupId>org.springframework.boot</groupId>
		<artifactId>spring-boot-maven-plugin</artifactId>
		<configuration>
			<mainClass>com.jd.entity.EntityApplication</mainClass>
			<classifier>exec</classifier>
		</configuration>
	</plugin>
</plugins>

关于SpringBoot启动提示Invalid value type for attribute ‘factoryBeanObjectType’: java.lang.String

最近在用最新的版本SpringBoot(3.3.1)搭建一个项目,依赖使用以前的maven依赖。然后启动结果提示

java.lang.IllegalArgumentException: Invalid value type for attribute 'factoryBeanObjectType': java.lang.String

一开始是因为IDEA的问题,经过一步一步的debug之后,发现是mybatis-plus依赖问题。

以前的依赖是使用了官方的:

        <dependency>
            <groupId>com.baomidou</groupId>
            <artifactId>mybatis-plus-boot-starter</artifactId>
            <version>3.5.5</version>
        </dependency>

后面官方针对SpringBoot3.x版本升级了,

        <dependency>
            <groupId>com.baomidou</groupId>
            <artifactId>mybatis-plus-spring-boot3-starter</artifactId>
            <version>3.5.6</version>
        </dependency>

如果使用的Springboot是3.x,必须使用mybatis-plus-spring-boot3-starter 否则就会提示错误。

SpringBoot项目打包出现Unable to find main class

如果你在尝试单独打包一个Spring Boot模块时遇到“Unable to find main class”的错误,这通常意味着Maven或Gradle在构建过程中没有找到带有@SpringBootApplication注解的主类,即程序的入口点。以下是几个可能的原因及相应的解决办法:


原因与解决方法:

方法一、缺少主启动类

  • 检查模块内是否确实存在一个带有@SpringBootApplication注解的类。
  • 确认该类包含一个公有的static void main(String[] args)方法。

方法二、主启动类命名或位置错误

  • 确认主启动类的名称和包路径是否与你在构建配置中指定的一致
  • 主启动类应位于模块的合理包路径下,通常直接在模块的主要源代码目录中。

方法三、构建插件配置问题

在模块的pom.xml或build.gradle中检查spring-boot-maven-plugin或bootJar的配置。

确保正确设置了mainClass属性,指向你的主启动类的全限定名,例如

       <build>
           <plugins>
               <plugin>
                   <groupId>org.springframework.boot</groupId>
                   <artifactId>spring-boot-maven-plugin</artifactId>
                   <configuration>
                       <mainClass>com.example.module.YourMainApplication</mainClass>
                   </configuration>
               </plugin>
           </plugins>
       </build>
       
bootJar {
   mainClassName = 'com.example.module.YourMainApplication'
}

方法四、模块依赖问题:

  • 检查是否有未解决的依赖问题,特别是那些可能影响到主启动类加载的依赖。
  • 确保所有必要的依赖都已正确声明并可用。

方法五、清理与重建:

  • 执行mvn clean install或gradlew clean build来清除旧的构建结果并重新构建。
  • 有时旧的构建工件或缓存数据可能会干扰新的构建过程。

通过以上步骤,应该能够定位并解决找不到主类的问题,从而成功地单独打包你的Spring Boot模块。

关于SpringBoot 多模块 无法自动装配Bean类型

1、在被引用模块中添加exec

2、增加扫描范围

@SpringBootApplication(scanBasePackages = {"com.xixi.web","com.xixi.dao"})
public class WebApplication {

    public static void main(String[] args) {
        SpringApplication.run(WebApplication.class, args);
    }

}

web模块引用dao模块,在web模块的时候就增加扫描范围到web和dao模块。

3、被引用模块需要Application启动入口

dao模块是被引用的,作为SpringBoot项目,入口是不能删除的。

Retrofit框架的简单使用(上)

一,导入依赖

implementation("com.squareup.retrofit2:retrofit:2.9.0")
implementation("com.squareup.retrofit2:converter-gson:2.9.0")
implementation("com.squareup.retrofit2:converter-scalars:2.9.0")
在AndroidManifest.xml中记得申请网络权限
    <uses-permission android:name="android.permission.INTERNET" />
    <uses-permission android:name="android.permission.ACCESS_NETWORK_STATE" />

二,定义个请求接口

import retrofit2.Call
import retrofit2.http.GET
import retrofit2.http.Query

interface ApiService {

    companion object {
        const val BASE_URL = "https://api.sunofbeaches.com/shop/"
    }

    //最后组合成完整地址:https://api.sunofbeaches.com/shop/discovery/categories
    @GET("discovery/categories")
    //@Query注解是查询参数,如果多个参数就写多个注解,用逗号分开
    fun test(@Query("test") str: String): Call<String>

}

三,开始使用

    var TAG: String = "Xiang"

    /**
     * 创建拦截器
     */
    var intercept = HttpLoggingInterceptor {
        Log.e(TAG, "onHttpRetrofit: $it")
    }.setLevel(HttpLoggingInterceptor.Level.BODY)

    /**
     * 添加拦截器
     */
    var okHttpClient = OkHttpClient.Builder().addInterceptor(intercept).build()


    var retrofit = Retrofit.Builder()
        .baseUrl(ApiService.BASE_URL)
        .addConverterFactory(ScalarsConverterFactory.create())
        .client(okHttpClient)
        .build()

    /**
     * 获取动态代理实例
     */
    var apiService = retrofit.create(ApiService::class.java)


    /**
     * 异步请求,不用协程或者子线程。
     */
//    apiService.test("100").enqueue(object : retrofit2.Callback<String> {
//        override fun onResponse(
//            call: retrofit2.Call<String>,
//            response: retrofit2.Response<String>
//        ) {
//            /**
//             * 请求成功
//             */
//            if (response.isSuccessful) {
//                Log.e(TAG, "onResponse: ${response.body()}")
//            }
//        }
//
//        override fun onFailure(call: retrofit2.Call<String>, t: Throwable) {
//            //请求是吧
//            Log.e(TAG, "onFailure: ${t.message}")
//        }
//
//    })

    /**
     * 同步请求,必须用协程或者线程去执行,不然会阻塞UI(主)线程
     */
    GlobalScope.async {
        var response = apiService.test("100").execute();
        if (response.isSuccessful) {
            Log.e(TAG, "onResponse: ${response.body()}")
        } else {
            Log.e(TAG, "onFailure: ${response.message()}")
        }
    }

关于Post请求,请跳转 Retrofit框架的简单使用(下)

HttpOk3通过Kotlin 请求简单Demo

开启网络权限

需要在AndroidManifest.xml 的manifest下添加网络权限

    <uses-permission android:name="android.permission.INTERNET" />
    <uses-permission android:name="android.permission.ACCESS_NETWORK_STATE" />

第一步:引入依赖

 implementation("com.squareup.okhttp3:okhttp:4.9.0")
 implementation("com.squareup.okhttp3:logging-interceptor:4.9.0")

添加过滤器

import android.util.Log
import okhttp3.Interceptor
import okhttp3.Response

class LogIntercept : Interceptor {

    override fun intercept(chain: Interceptor.Chain): Response {
        var request = chain.request()
        var url = request.url
        Log.e("Xiang", "intercept: 这里是请求过滤器,请求地址:${url}")
        return chain.proceed(request)
    }
}

二:GET请求

        GlobalScope.async {
            var okHttpClient = OkHttpClient.Builder().addInterceptor(LogIntercept()).build()
            var request: Request = Request.Builder()
                .url("https://api.admin.com/shop/discovery/categories")
                .build()
            okHttpClient.newCall(request).enqueue(object : Callback {
                override fun onFailure(call: Call, e: IOException) {

                }
                override fun onResponse(call: Call, response: Response) {
                    if (response.isSuccessful) {
                        response.body?.let {
                            val dataBody = it.string()
                            Log.e("Xiang", dataBody)
                        }
                    }
                }
            })
        }

三:form表单提交

 var okHttpClient = OkHttpClient.Builder().addInterceptor(LogIntercept()).build()
    var formBody = FormBody.Builder()
        .add("AD_user","admin")
        .add("AD_pass","888888")
        .build()

    var request: Request = Request.Builder()
        .url("https://api.admin.com/admin/Chk_login.asp")
        .post(formBody)
        .build()

    okHttpClient.newCall(request).enqueue(object : Callback {
        override fun onFailure(call: Call, e: IOException) {
            e.message?.let {
                Log.e("Xiang", it.toString())
            }
        }
        override fun onResponse(call: Call, response: Response) {
            if (response.isSuccessful) {
                response.body?.let {
                    val dataBody = it.string()
                    Log.e("Xiang", dataBody)
                }
            }
        }
    })

四:JSON格式提交

    var okHttpClient = OkHttpClient.Builder().addInterceptor(LogIntercept()).build()
    var stringBody = "{\"username\":\"123456\",\"password\":\"123456789\"}"
        .toRequestBody("application/json;charset=utf-8".toMediaType())
    var request: Request = Request.Builder()
        .url("https://auth.admin.com/login")
        .post(stringBody)
        .build()

在SpringBoot中响应出xml格式数据。

我们在用SpringBoot开发的时候,经常响应的数据一般都是json格式或者字符串。

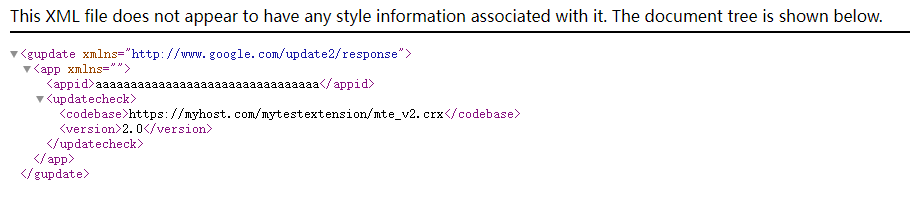
当时偶尔我们也要响应xml格式,比如在更新chrome 插件的时候,如下xml格式:

<?xml version='1.0' encoding='UTF-8'?>
<gupdate xmlns='http://www.google.com/update2/response' protocol='2.0'>
  <app appid='aaaaaaaaaaaaaaaaaaaaaaaaaaaaaaaa'>
    <updatecheck codebase='https://myhost.com/mytestextension/mte_v2.crx' version='2.0' />
  </app>
</gupdate>

那么如何处理呢?手动拼接、替换?其实我们不用这么麻烦,可以用到一个开源库,一下是它的maven

     <dependency>
            <groupId>com.fasterxml.jackson.dataformat</groupId>
            <artifactId>jackson-dataformat-xml</artifactId>
        </dependency>

然后创建三个类:

public class UpdateCheck {

    private String codebase;
    private String version;

    @JsonProperty("codebase")
    public String getCodebase() {
        return codebase;
    }

    public void setCodebase(String codebase) {
        this.codebase = codebase;
    }

    @JsonProperty("version")
    public String getVersion() {
        return version;
    }

    public void setVersion(String version) {
        this.version = version;
    }
}
import com.fasterxml.jackson.annotation.JsonProperty;
import com.fasterxml.jackson.dataformat.xml.annotation.JacksonXmlRootElement;

@JacksonXmlRootElement(localName = "gupdate", namespace = "http://www.google.com/update2/response")
public class GUpdate {

    private App app;

    @JsonProperty("app")
    public App getApp() {
        return app;
    }

    public void setApp(App app) {
        this.app = app;
    }
}
public class App {

    private String appid;
    private UpdateCheck updateCheck;

    @JsonProperty("appid")
    public String getAppid() {
        return appid;
    }

    public void setAppid(String appid) {
        this.appid = appid;
    }

    @JsonProperty("updatecheck")
    public UpdateCheck getUpdateCheck() {
        return updateCheck;
    }

    public void setUpdateCheck(UpdateCheck updateCheck) {
        this.updateCheck = updateCheck;
    }
}

然后再Controller中定义使用。

   
    @GetMapping(value = "/xml", produces = MediaType.APPLICATION_XML_VALUE)
    public String  getXmlData() throws JsonProcessingException {
        XmlMapper xmlMapper = new XmlMapper();
        GUpdate gUpdate = new GUpdate();
        App app = new App();
        app.setAppid("aaaaaaaaaaaaaaaaaaaaaaaaaaaaaaaa");
        UpdateCheck updateCheck = new UpdateCheck();
        updateCheck.setCodebase("https://myhost.com/mytestextension/mte_v2.crx");
        updateCheck.setVersion("2.0");
        app.setUpdateCheck(updateCheck);
        gUpdate.setApp(app);
        return xmlMapper.writeValueAsString(gUpdate);
    }

以上controller响应需要用到的库。

import org.springframework.http.MediaType;
import org.springframework.web.bind.annotation.GetMapping;
import org.springframework.web.bind.annotation.RequestMapping;
import org.springframework.web.bind.annotation.RestController;
import com.fasterxml.jackson.core.JsonProcessingException;
import com.fasterxml.jackson.dataformat.xml.XmlMapper;

响应结果

SpringBoot项目中普通类使用Bean。

我们在SpringBoot中使用Bean的方式是@Autowired 方式自动注入的,但是在某些普通类中使用Bean的话,就不能使用这种方式,比如以下场景:

在使用 import org.java_websocket.client.WebSocketClient; 作为客户端去链接WebSocket服务器的时候,必须使用有参构造,而不能自动注入的情况下,我们要在WebSocketClient中使用自动注入过的redis、mysql等,使用 @Autowired 获取的对象是null,那么只能直接从SpringBoot的Bean对象管理器中拿取所需要的Bean对象。

操作步骤:

一、定义一个获取Bean的工具类。

定义工具类 SpringUtil (名字自定义) 实现 org.springframework.context.ApplicationContextAware 这个接口,代码如下:

@Component
public class SpringUtil implements ApplicationContextAware {

    private static ApplicationContext applicationContext;

    @Override
    public void setApplicationContext(ApplicationContext applicationContext) throws BeansException {
        SpringUtil.applicationContext = applicationContext;
    }

    public static <T> T getBean(Class<T> beanClass) {
        return applicationContext.getBean(beanClass);
    }

    public static <T> T getBean(String beanName, Class<T> beanClass) {
        return applicationContext.getBean(beanName, beanClass);
    }
}

记住,这个类一定要添加 @Component 组件注解

二、使用demo

在一个普通类中使用,比如我们想获取RabbitMq的自动注入对象。

RabbitTemplate rabbitTemplate= SpringUtil.getBean(RabbitTemplate.class);
rabbitTemplate.convertAndSend("test_message","test"+new Date());
原理:就是SpringBoot的Bean都交由ApplicationContext applicationContext 来管理,我们只是间接的从 ApplicationContext applicationContext 这个对象中获取,更多的可以参考Spring的原理。

SpringBoot按每天日期来分割日志配置

SpringBoot的日志是非常重要的一项内容,因为我们可以清晰的记录错误异常以及调试。

第一步,添加依赖:

       <dependency>
            <groupId>org.projectlombok</groupId>
            <artifactId>lombok</artifactId>
        </dependency>
        <!--这个依赖可以不加,但是有时候会出现问题,建议加上。-->
        <dependency>
            <groupId>ch.qos.logback</groupId>
            <artifactId>logback-classic</artifactId>
        </dependency>

        <dependency>
            <groupId>org.slf4j</groupId>
            <artifactId>slf4j-log4j12</artifactId>
        </dependency>

第二步,添加配置文件

在目录 /src/main/resources 中添加文件,文件名:logback-spring.xml ,文件名必须是这个,文件内容如下:

<?xml version="1.0" encoding="UTF-8"?>
<configuration>
    <!-- 定义日志输出目录 -->
    <property name="LOG_PATH" value="/tmp/logs/jishuge" />

    <!-- 控制台输出日志 -->
    <appender name="CONSOLE" class="ch.qos.logback.core.ConsoleAppender">
        <encoder>
            <pattern>%d{yyyy-MM-dd HH:mm:ss.SSS} [%thread] %-5level %logger{36} - %msg%n</pattern>
        </encoder>
    </appender>

    <!-- 按照每天日期分割日志文件 -->
    <appender name="FILE" class="ch.qos.logback.core.rolling.RollingFileAppender">
        <rollingPolicy class="ch.qos.logback.core.rolling.TimeBasedRollingPolicy">
            <fileNamePattern>${LOG_PATH}/%d{yyyy-MM-dd}.log</fileNamePattern>
            <maxHistory>30</maxHistory>
        </rollingPolicy>
        <encoder>
            <pattern>%d{yyyy-MM-dd HH:mm:ss.SSS} [%thread] %-5level %logger{36} - %msg%n</pattern>
        </encoder>
    </appender>

    <!-- 设置日志输出级别 -->
    <root level="info">
        <appender-ref ref="CONSOLE" />
        <appender-ref ref="FILE" />
    </root>
</configuration>

以上是最简单的一个配置,每天 /tmp/logs/jishuge 目录下,产生日志文件,比如2022-06-12.log 这样的按日志分割。

想不到的Invalid bound statement (not found)问题解决方案

在SpringBoot中开发,如果出现了Invalid bound statement (not found),不管是从翻译的意思和网上搜索引擎以及论坛给的答案都是你Mapper文件没有给对。

第一、你的配置文件没有给对,比如:

mybatis-plus:
  mapper-locations: classpath*:/mapper/*.xml

第二、是的的mapper中命名空间没有找到对的Dao文件像这样:

<mapper namespace="com.baidu.ai.auth.dao.XUserAccountDao">

第三,还有就是pom配置文件的build插件没有导入资源,比如:

<build>
        <resources>
            <resource>
                <directory>src/main/java</directory>
            </resource>
            <resource>
                <directory>src/main/resources</directory>
                <includes>
                    <include>**/*.xml</include>
                    <include>**/*.yml</include>
                    <include>**/*.properties</include>
                </includes>
            </resource>
        </resources>
        <plugins>
            <plugin>
                <groupId>org.springframework.boot</groupId>
                <artifactId>spring-boot-maven-plugin</artifactId>
            </plugin>
        </plugins>
    </build>

重点来了!!!!!!!,当你发现所有的都检查了,发现还是报这个错误。

其实还有错误也会导致这种提示,那就是pom里面的依赖不兼容的时候,

比如,你引入了Mybatis和Mybatis-plus然后就掐架了。

比如,还有各种版本号不兼容的情况下。

最后把所有的版本都兼容了之后,代码显示正确了。

        <dependency>
            <groupId>org.mybatis.spring.boot</groupId>
            <artifactId>mybatis-spring-boot-starter</artifactId>
            <version>3.0.1</version>
        </dependency>

       <dependency>
            <groupId>com.baomidou</groupId>
            <artifactId>mybatis-plus-boot-starter</artifactId>
            <version>3.5.3.1</version>
        </dependency>

        <dependency>
            <groupId>com.baomidou</groupId>
            <artifactId>mybatis-plus-annotation</artifactId>
            <version>3.5.3.1</version>
        </dependency>

这个提示真的坑哦,如果提示冲突,或者直接给出很明显的异常都好排错。